5 No-Brainer Ways to Help Improve Your Google Analytics Setup
![]() Google Analytics is an amazing, free tool for learning more about the people who visit your website and it is incredibly valuable in helping to decide where to focus your energy to improve your site. If you don't have any kind of analytics set up on your website, stop what you're doing and add Google Analytics right now.
Google Analytics is an amazing, free tool for learning more about the people who visit your website and it is incredibly valuable in helping to decide where to focus your energy to improve your site. If you don't have any kind of analytics set up on your website, stop what you're doing and add Google Analytics right now.
We add Google Analytics on all of our websites and your basic setup gives you a ton of great information, but there are a few really easy ways to improve the basic Google Analytics setup and get much more value from the data. And the best part is you can make all of these changes in less than 15 minutes!
This post will give you step-by-step instructions for how to:
- Create annotations to mark major events for future reference
- Add handy custom reports in just three clicks
- Enable site search tracking
- Add event tracking for important offsite links
- Create goals to measure results
1) Create annotations to mark website milestones for future reference
Annotations are an oft-forgotten tool in Google Analytics because they're kind of hidden. They're really helpful however, when you're looking back at your analytics data and can't remember why a particular traffic spike occurred or how the change you made to improve volunteer submissions actually worked out.
To add an annotation, take the following steps:
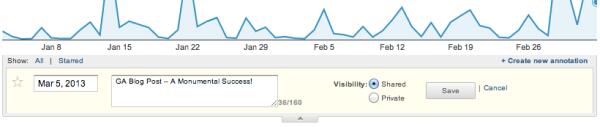
- Go to any of the basic Google Analytics overviews (ex. Audience Overview)
- Click the downwards arrow just below the graphic overview
- Click '+ Create new annotation' on the right-hand side of the page
- Select the date of the milestone
- Add a note that provides the details of what happend (for example, "Created my first goal!")
- Mark 'Visibility' as 'Shared'
- Click Save
These annotations show up across all your analytics reports and they can be great indicators for how a particular change affected your site. We always add an annotation to indicate when a new website launches so we can quickly see how the website activity differs between the new site and the old one. It's really nice to be able to quickly determine for example, that a new website led to a 275% increase in organic search traffic and a 27% increase in the time on site.
2) Add extremely helpful custom reports in 30 seconds
Custom reports are a little bit complicated. Fortunately, the folks over at Econsultancy put together a list of 10 valuable Google Analytics custom reports that you can enable with almost no effort. UPDATE: Google has also put together a more extensive list of easy-to-implement custom reports, dashboards and advanced segments.
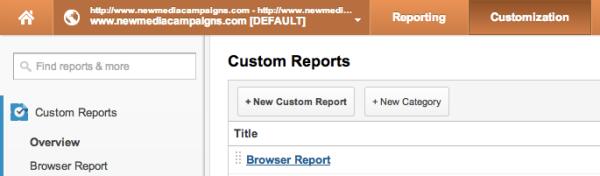
All you have to do to set up these great reports is:
- Log into your Google Analytics account
- Click on the custom report links below
- Select your website Google Analytics profile
There are a variety of reports that will be helpful for different kinds of organizations but the first six are super handy for pretty much everyone! Once you've added the custom reports, you can view them in your Google Analytics by clicking on the 'Customization' tab at the top of the page.
- GA time of day report
Great for figuring out when to post updates to your social media accounts - Keyword analysis report
See which keywords lead to the most goal completions - Non-branded keyword report
Isolate which non-branded keywords are performing well - Referring sites report
Find out who is sending traffic your way - Link analysis report
Similar to #4 but shows where inbound links are directing traffic - Should I go mobile? report
Figure out if you need to find someone to help you build a mobile website - Browser report
See if your site is performing poorly in a browser. Maybe there's a bug you haven't seen yet. - Google https Change Impact report
Check out how much of your analytics is hidden because of Google's privacy updates - Time and ecommerce report
Figure out what time of the day is most profitable - Better Adwords report
Perfect if you're tired of switching between Google Analytics and Adwords
The only report that requires a little more work is the non-branded keyword report. Once you add the report, you'll need to add the name of your organization so Google Analytics can exclude the appropriate keywords. To do that, take the following steps:
- Click on the 'Customization' tab at the top of your Google analytics
- Click on the 'SEO - Non-branded' custom report in the left-hand sidebar
- Click the 'Edit' link at the top of the page
- Scroll down to the 'Filters' label
- Find the second tab that says Exclude – Keyword – Regex – Lion
- Replace Lion with (Your|Organization|Name)
- Make sure each word of your organization's name is separated by a pipe and the whole thing is enclosed in parentheses
- Scroll down and click 'Save'
3) If your site has a site search, enable Site Search Tracking
This one only needs to be done if visitors can search your site for content that they're having trouble finding. It's particularly useful because you can quickly see what content you may need to consider placing in a more obvious location or what topics you should be writing about if the content doesn't exist.
Here's step by step instructions for how to enable Site Search Tracking
- Go to the Admin tab in your Google Analytics
- Go to the profile that you want to enable Site Search Tracking on
- Click on the 'Profile Settings' tab
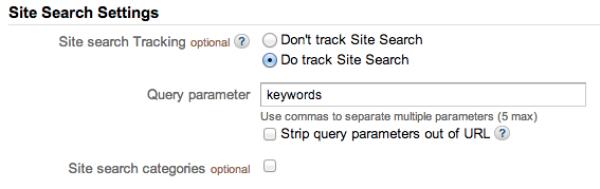
- Scroll to the button and select 'Do track Site Search'
- In the 'Query parameter' field, add your query parameter (see below for more)
- Do not check 'Strip query parameters out of URL'
- Click 'Apply'
![]() Here's how you figure out your query parameter:
Here's how you figure out your query parameter:
- Open a new browser window or tab and go to your website
- Search for something random using your site's search box (I always search for 'Chewbacca' in case there's a fun fact I don't know)
- Cut and paste the URL of the search results page into something like Microsoft Word so you can more easily read it
- Use your investigative skills and locate your search term in the URL.
- Just before your term, you'll see an equals sign and a word or letter (ex. newmediacampaigns.com/search?keywords=chewbacca)
- The word or letter just before the equals sign is your query parameter. In my example, the query parameter is the word "keywords". You can ignore everything else.
Some common query parameters are:
- q
- s
- keyword
- search
- name
Once you've enabled Site Search Tracking, you can see what people are searching for by going to Content -> Site Search -> Overview in your Google Analytics. It's important to note that it can take up to 24 hours before Google Analytics starts recording visitor searches so if you don't see anything there immediately, give it a day and check again.
4) Add event tracking for any important offsite links
Adding event tracking is a little intimidating at first because you have to dive into HTML of a site in order to add it. If you know what to look for and use a few helpful tools though, it's as easy as copying and pasting!
At a minimum, you should add event tracking to important offsite links like social media or email marketing subscription buttons (that go directly to a vendor like Constant Contact, Mailchimp or Campaign Monitor). You can also add event tracking to file downloads like important whitepapers, affiliate links or when someone clicks the 'play' button on a video.
The basic parts of adding event tracking are:
1) get your event tracking code and
2) adding that code on your website.
Fortunately, the kind people over at GAconfig have made both parts super easy and you can simply go to gaconfig.org/google-analytics-event-tracking and follow their instructions. To make things even more clear however, we'll walk through a real-life example – adding Event Tracking to a Facebook link.
Part 1: Getting your Event Tracking code
- Go to gaconfig.com/google-analytics-event-tracking
- In Step 1, select Social Follow/Share/Like
- In the Category field, put "Social Media"
- In the Action field, put "Facebook"
- In the Label field, put "Like" or "Click"
- In the Value field you don't need to add anything
- In the Non-Interaction field, select "true" if the person will leave your site when they click the link. In this case, they will be taken to facebook.com so select "true"
- Copy the code that begins with "onClick". In this case, your code should be
onClick="_gaq.push(['_trackEvent', 'Social Media', 'Facebook', 'Click',, true]);"
That's it! You're half-way there!
Part 2: Adding the Event Tracking code to your website
Part 2 will vary depending on your specific website setup but for the sake of this example, I'll assume that you have some kind of Content Management System (CMS) where the Facebook link exists in a WYSIWYG editor (if your site isn't powered by a CMS, let us know and we'd love to see if we can help make your life much easier!).
- Go to the page in your CMS where the Facebook link is set up

- Click on the HTML button. You will see a bunch of HTML pop up.
![]()
- Search for your Facebook link. It will look something like:
<a href="https://www.facebook.com/newmediacampaigns">Facebook page</a>
- Paste the code from Part 1 after the a Facebook link quotation mark but before the first '>'.
- Your new code will look something like:
<a href="https://www.facebook.com/newmediacampaigns" onClick="_gaq.push(['_trackEvent', 'Social Media', 'Facebook', 'Click',, true]);">Facebook page</a> - Click 'Update'
- Save the page


Playing around with the HTML may seem daunting at first, but once you do it a couple times, it'll become second nature! Now that you've set up an event to track, you can actually view the data in your Google Analytics by going to Content > Events > Overview. Event tracking can be used in a lot of different ways to better quantify how visitors interact with your website.
5) Create at least one goal
 Goals are the foundation of reporting concrete successes (or failures) of a website. There are variety of different ways that you can measure those successes but it's important to establish at least one measurable goal for your website.
Setting up goals is particularly useful when you want to see how a particular blog post or marketing initiative lead to conversions on your website. Goals are often used in conjunction with Event Tracking.
Here are step-by-step instructions for setting up a goal for a form submission that redirects visitors to a confirmation page after filling out the form:
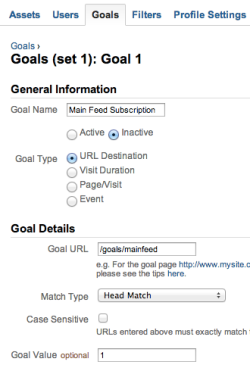
- Go to the Admin tab in GA
- Click on the profile that you want to add a goal to
- Click on the 'Goals' tab
- Click '+ Goal'
- Give the Goal a name (ex. Newsletter subscription)
- For 'Goal Type', choose 'URL Destination'
- In the 'Goal URL' field, put the confirmation page's end-URL (for example, /volunteer-signup/thank-you)
- In the 'Match Type' field, choose 'Head Match'
- Add a Goal Value (ex. 1)
- Click 'Save'
The goal value is usually used to associate a monetary value to a certain action on the site. For example, if 20% of people who fill out a contact form on your site end up becoming a customer and the average value of a customer is $200, then the goal value would be $40 (or 40).
If you aren't selling a product or trying to acquire customers, you should still set up a goal value relative to your other goals on the site. For instance, newsletter subscriptions might be worth 1 and volunteer signups might be worth 5.
By incorporating these five Google Analytics additions, you are setting yourself up to be able to see a much clearer picture of how visitors navigate your site, how they got there and how you can improve their experience. Let us know if you have any other great ways to improve Google Analytics!


Comments
Musa
That's great Article, am currently using the same Google Analytics Counter Tracker plugin and i must say it's the best plugin as far as am concern.Betty
Google Analytics Counter Tracker plugin on WordPress is Very simple and easy to use.If you Connect your Google Analytics account, you get Google Analytics stats; Group stats by hour, day, month and year; you can See data for different time periods in your reports; it is Compatible with almost every version of WordPress; and Mobile-Friendly Design; it is Multilingual.articles attracting visitors
We stumbled over here by a different website and thought I shouldcheck things out. I like what I see so now i am following you.
Look forward to exploring your web page yet again.
Aidan
Thanks for this, a great help.Alex Pomer NMC team member
@Geoff:First, I'm glad you found the post helpful! I like to use the category label as the top-level breakdown of the things I'm trying to track. As I mention in the post, I love http://gaconfig.com/google-analytics-event-tracking/ to make Event Tracking as easy as possible. I also use their Step 1 dropdown menu as a guide for what to use as the different categories in my Event Tracking. For example, you may want to use 'Videos' as one category, 'Social Media' as another, and 'File Downloads' as a third category.
For the Action field, I like to use something general that may be true across multiple categories, like 'Click' or 'Play' or 'Download'.
I use the label field to note what is is the user is clicking, playing or downloading. For you, it might be one of the 'Tweet', 'Like', or 'Email This' buttons on one of your blog posts.
I hope that helps!
Geoff
Instantly retrospectively applied annotations to mark website milestones which will need to be fleshed out over the next few weeks but got the key relaunches done. Thanks.That was an added bonus as I came here to understand Event Tracking. I've got it set up and working for Videos (as a Category) but was thinking of adding another category but am struggling to set how Action and Label would work across categories in a useful sense. Originally thought I would navigate to Categories and see the other ones but it's all jumbled... any advice?
GD
Nice work! Very helpful. I used all of them right away.Anuj - Digital marketer
Setting the custom reports as simple as using as an interactive i-pad which i love to use on daily basis... The google analytics also needs hands on practices on daily basis then you can optimize each and every site however it is eCommerce or some scrappy one.... Let's just enhance your skills on using it... only a day or two you need to spend on it....Alex Pomer NMC team member
@Kevin – Haha, nice! Glad you found it helpful!Kevin Hill
Here I was just thinking I should create myself a custom analytics report and you saved me the trouble! That's serendipity. Thanks Alex- nice post.Leave a comment